



Foreword
In many cases, we still cannot foresee the impact that the evolution of artificial intelligence will have on the evolution of humankind as a species inhabiting the Earth. Morals and values are genuinely under threat from this development, and given that humankind tends to lean towards the dark side with every discovery that could benefit progress, we are entering a new era of cyber-attacks and cybersecurity issues unlike anything we have seen before.
More than ever, the common sense of users of computer systems will play a major part in keeping their data secure and safe from attacks and unwanted blackmail. Furthermore, there is the resilience of the developers and maintainers of applications – in this case, open-source software for the Linux ecosystem and, consequently, for our Mageia distribution.
Speaking personally, as a Mageia user since its inception, there are certain features in Mageia that have remained unchanged over time and which mean that I prefer to install Mageia on my computers over other distributions:
- Separation of the ‘user’ and ‘system’ partitions. This results in improved security and makes it easier to reinstall the system.
- Separation of ‘administrator/root’ and ‘user’ passwords. Mageia continues to keep the ‘sudo’ option disabled by default during installation, which means you have to enter different passwords for both users.
- Security centre with a graphical interface. In the Mageia Control Centre, we have graphical security options that I haven’t seen in other systems.
And although Mageia can, for various reasons, be considered one of the most stable and secure distributions on the Linux scene, it never hurts to add a well-configured layer of security to our system. This is where ClamAv comes in – an antivirus programme that we can install from the repositories and, with the right configuration, use to further protect our personal files. So let’s explain how to configure this antivirus programme, which offers real-time protection for Linux.
Installation
Installing ClamAV is extremely straightforward in Mageia and can be done either via the software centre or via the command line in the terminal. But first, I’d like to explain what we’ll be installing:
- ClamAV: Antivirus application; its database will be installed as a dependency.
- Clamd: Multi-process service for virus scanning.
- Clamtk: Graphical user interface for ClamAV for on-demand scanning.
To install these packages
- Software Centre: First, set all the filters in the Software Centre to ‘All’, then search for the packages mentioned above and install them.
- Terminal commands: Open a terminal as the ‘root’ user and install using: urpmi clamav clamd clamtk.
This completes the installation.
Configuration
We have two options here: to leave ClamAV set to on-demand scanning, or to also configure real-time protection. So we’ll explain both processes. But first of all, we need to enable the antivirus services for the next reboot in the Mageia Control Centre:
- Open the Mageia Control Centre.
- Go to the “System” section and then to “Manage system services by enabling or disabling them”.
- Look for these services and enable the “On startup” option:
- clamav-daemon: This is the antivirus engine. When active, scans are much faster because the database is already loaded into memory.
- clamav-freshclam: This is the service that keeps the signatures up to date in the background.
- clamav-clamonacc: Enables “Real-time protection”. Bear in mind that this uses more system resources and may slow down the opening of files (we’ll look at how to configure this to optimize this later).
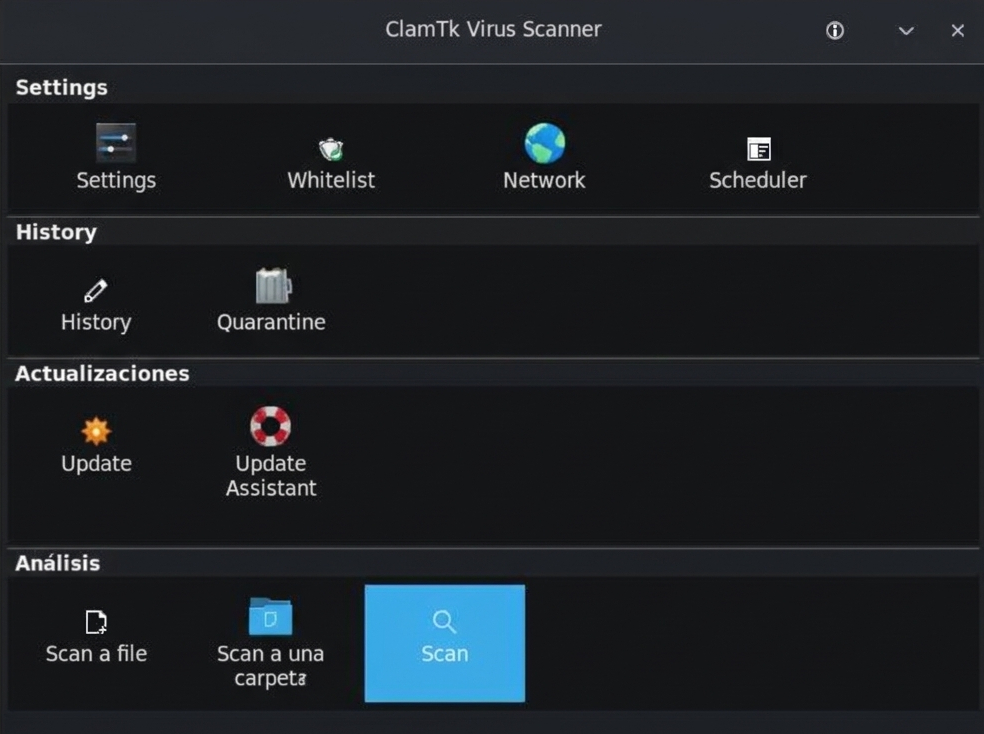
The sections in ClamTk:
- Settings:
- Settings. To select the scan level required.
- Whitelist. Files included in the list will not be scanned.
- Network. Allows you to configure network and proxy options, etc.
- Scheduler. Allows you to schedule daily scans and definition updates.
- History:
- History. Allows you to view details of previous scans.
- Quarantine. Allows you to view files detected and placed in quarantine.
- Updates:
- Update. To update virus definitions.
- Update Wizard. Configure definition updates, either manually or automatically.
- Scan:
- Scan a file. Scans individual files.
- Scan a folder. Scans folders; by default, it opens the scan for the home folder.
- Scan. Allows you to check the previous scan results for a file or rescan it.
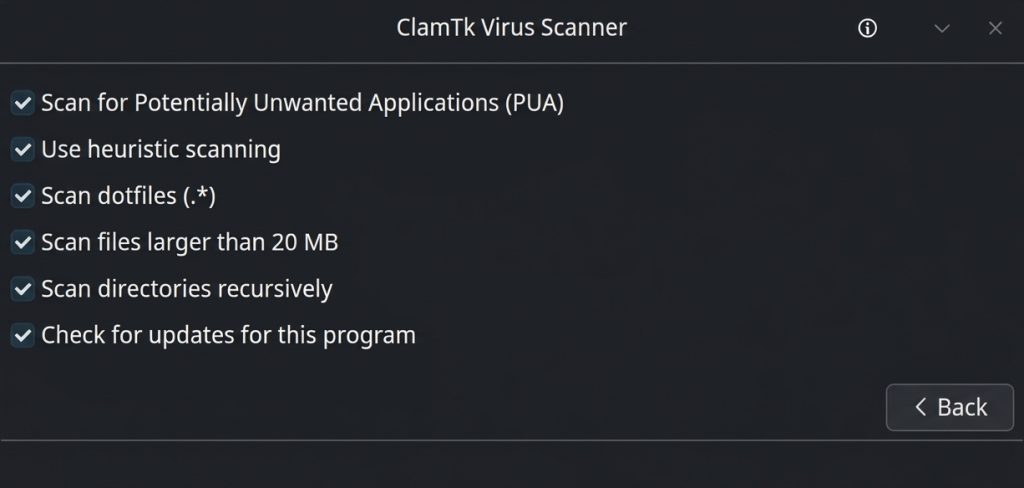
In ClamTk, we select the ‘Settings’ option to choose the scan level we require. In my case, I have ticked all the boxes; this will make the process a little slower but may detect more threats, should there be any. Bear in mind that we’ll then need to analyse any files found, as there may be false positives. For example, a spreadsheet containing macros might be flagged as suspicious, and the antivirus will recommend placing the files in quarantine so that we can review them later.
On-demand antivirus
If we only want to perform on-demand scans, we’ll enable the two services mentioned above (clamav-daemon and clamav-freshclam), and from the ClamTk application we can perform on-demand scans of both folders and files.
We can also do this via the terminal using the following options:
- To scan a single file: clamscan /path/to/file.txt
- To scan a folder: clamscan /path/to/the/folder
- To scan a folder and its subfolders: clamscan -r /path/to/the/folder
- You can find more scanning options in the ClamAV documentation.
Real-time protection
ClamAv offers real-time protection on Linux. During installation, Mageia automatically creates the configuration file required to enable this option, but we’ll look at how to configure the file to optimise scanning and system resources. For a home computer, we’ll adjust a few settings whilst also configuring the paths on our computer that we wish to protect.
1. Enabling the clamav-clamonacc service
Firstly, if we haven’t already done so, we’ll enable the “clamav-clamonacc” service as described earlier in the Mageia Control Centre. After restarting the system, the necessary services should be up and running. We can check this from a terminal as root using the following command: “systemctl –no-pager –full status clamav-daemon.service clamav-clamonacc.service clamav-freshclam”.
2. Creating the quarantine folder
The real-time protection service is configured to move suspicious files to the /root/quarantine folder. This folder is not created during installation (this will be reported to the relevant team to explore better integration for our users), so we must create it ourselves. The simplest way is to create it via the terminal in “root” mode using this command, which will also set the necessary permissions: “install -d -o root -g root -m 700 /root/quarantine”.
3.- Configuring the “clamd.conf” file
To complete the activation of real-time protection, we are going to modify the “clamd.conf” file located in “/etc/”. We can edit this file using any text editor; we’ll try kwrite and Featherpad, which allow us to save the changes directly after entering the root password.
To optimise resource usage, it is advisable to modify these settings; we can comment them out (this will disable the setting) or uncomment them (this will enable the setting) using “#”. Example:
- #OnAccessExcludeUname clamav. This setting is disabled for the application.
- OnAccessExcludeUname clamav. This setting is enabled for the application (enabling it may change the value of the line).
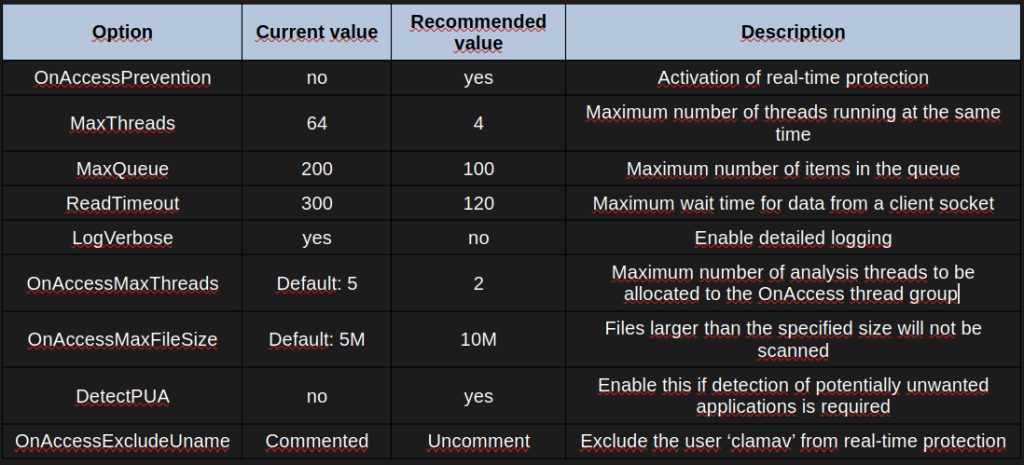
It is advisable to specify the folders you wish to monitor. This is done via the “OnAccessIncludePath” setting. The example provided is “OnAccessIncludePath /home/”. In our case, we have configured the following folders:
- /home/user/Shared
- /home/user/Downloads
- /home/user/Documents
- /home/user/Desktop
- /home/user/Pictures
- /home/user/Music
- /home/user/Videos
These are the main folders in the user’s personal home directory. They will cover most file movements. You can add many other paths, but bear in mind that this may increase resource usage.
Following these guidelines will result in an initial file-optimisation configuration, but we encourage you to explore this further and share your experience with us in the comments section. With this configuration, RAM usage on various machines is around 1 GB – a figure that may seem excessive, but which, compared to other applications such as web browsers or Electron-based applications, is actually quite modest, bearing in mind that the scan is constantly running in the background.
4. Final test and review
Once all the configuration is complete, we will carry out a test scan on a sample file. This test is known as EICAR; it was developed by the European Institute for Computer Antivirus Research and consists of a file used to check the extent of our antivirus scan and whether it is functioning correctly.
To do this, create a plain text file named “eicar.txt” and paste the following string of characters (without the quotation marks) into the file: “X5O!P%@AP[4\PZX54(P^)7CC)7}$EICAR-STANDARD-ANTIVIRUS-TEST-FILE!$H+H*”. You can save this file, for example, in the downloads folder; if the system is working correctly, the file will disappear and be moved to the quarantine folder at the path “/root/quarantine”.
After running the test, here is a summary of the checks:
- Check that the specified services are running from a terminal as root using “systemctl –no-pager –full status \ clamav-daemon.service clamav-clamonacc.service clamav-freshclam.service”.
- Check the paths configured to be monitored by real-time protection.
- Check ClamAV’s resource usage using the system’s resource monitor.
- View the current status of clamonacc as root: systemctl cat clamav-clamonacc.service
- View recent messages from clamonacc as root: journalctl -u clamav-clamonacc.service -n 30 –no-pager
- View the clamonacc log as root: tail -n 40 /var/log/clamav/clamonacc.log
- Check the quarantine directory as root: ls -la /root/quarantine
- Check the monitored folders in the log as root: journalctl -u clamav-clamonacc.service -b –no-pager
After checking the files in the quarantine, we can proceed to delete them using the file manager in administrator mode by navigating to the quarantine folder, or via the terminal as root using:
- “cd /root/quarantine”: to navigate to the quarantine folder.
- “ls”: to list the files in the folder.
- “rm filename” to delete a specific file.
- “rm -f *”: to delete all the contents of the folder.
This completes the configuration of our antivirus for Mageia, installed and updated from the official repositories, with real-time protection and on-demand scanning via the ClamTk graphical interface.
We hope this new potion will help you boost the security of your Mageia system!
